Blog Archive
-
▼
2008
(22)
-
▼
February
(17)
- create solar eclipse in photoshop
- eclipse in photoshop
- fire effect in PS
- correcting a photo in photoshop
- fisheye effect
- add a tatoo
- adding sunburst
- Vignette with an extra tweak
- lightning in photoshop
- popup from frame wid photoshop
- swapping faces
- Making a collage from a Photo in Photoshop
- skin colour toning....
- blending 2 images in photoshop
- advanced blending
- moonset in water..
- convert a pic inta a sketch...
-
▼
February
(17)
counter
 Used the tutorial below this post to create this. Instead of choosing the Elliptical Marque Tool to create a circular selection for the 'eclipse' effect illustrated below, I have used the Shape Tool.
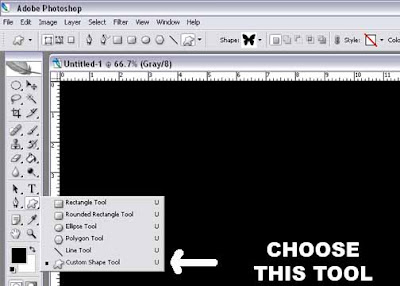
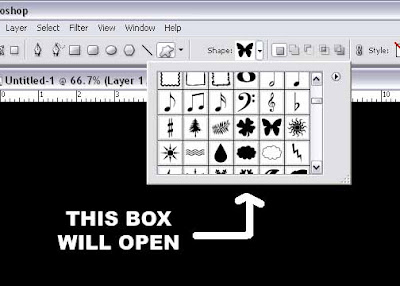
Step 2 : This dialogue box will open. It may vary slightly in Photoshop7. I am using Photoshop CS2. But that does not matter. I have chosen the butterfly. You can choose any shape.
Step 3 : The butterfly outline has been drawn. I set the Foreground colour to White before drawing the outline. Make sure you do so too. Now add Outer Glow and Inner Glow before going to the next step. See the earlier tutorial

Step 4 : Notice that a Vector Mask has been formed. You need not worry what it is. Just know that a Vector Mask has been formed.
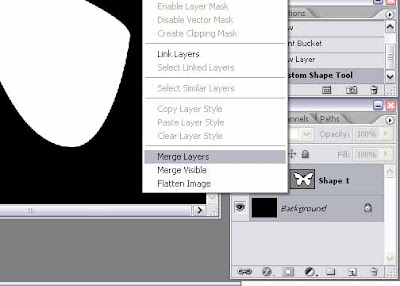
Step 5 : Press SHIFT on your keyboard to select both the 'Background' and 'Shape 1'. When the dialogue box opens click Merge Layers. This will merge the two layers.
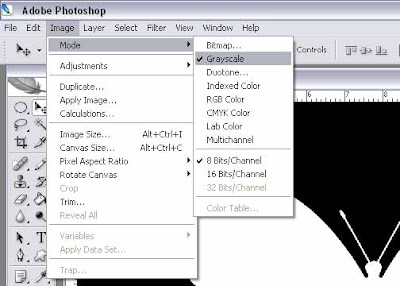
Step 6 : Go to Image. You will see a tick next to Grayscale. This has to be changed to RGB.
This is what is different from the 'Eclipse' Tutorial.
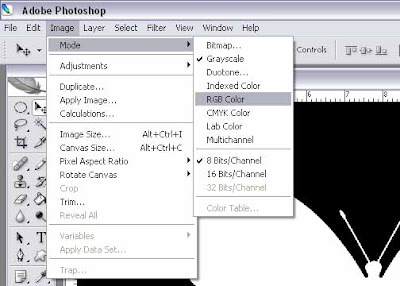
Step 7 : While the dialogue box is open, click 'RGB Color' to select it.
 Step 8 : Now just follow the steps in the other tutorial. Click the New Layer Button. A new layer will form.
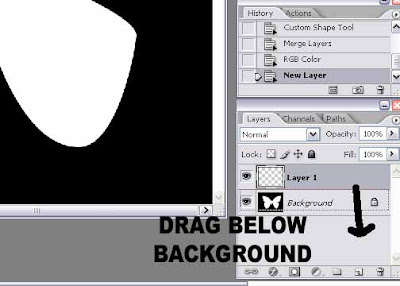
Step 9 : Double click the Background Layer to make it editable. Remember to do it. Then drag Layer 1 below it.

Step 10 : Now Layer 1 is below Layer 0
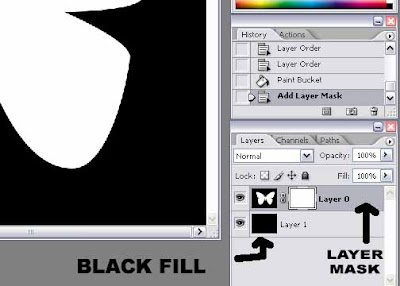
Step 11 : Now fill the Layer1 (the new layers) with Black with the Paint Bucket Tool. Click on Layer 0 and click the Layer Mask Button. The Mask has been formed. If you have read the earlier tutorial it will present no difficulties.

Step 12 : Now add the gradient. See the earlier Tutorial on how to do it.

Step 13 : Now go to Filter>Render>Lens Flare and add the Lens Flare.

Step 14 : Here's the finished image. You can use this as baackground and blend other images into it.
About Me
- satwik sharma
0 comments: