Blog Archive
-
▼
2008
(22)
-
▼
February
(17)
- create solar eclipse in photoshop
- eclipse in photoshop
- fire effect in PS
- correcting a photo in photoshop
- fisheye effect
- add a tatoo
- adding sunburst
- Vignette with an extra tweak
- lightning in photoshop
- popup from frame wid photoshop
- swapping faces
- Making a collage from a Photo in Photoshop
- skin colour toning....
- blending 2 images in photoshop
- advanced blending
- moonset in water..
- convert a pic inta a sketch...
-
▼
February
(17)
counter

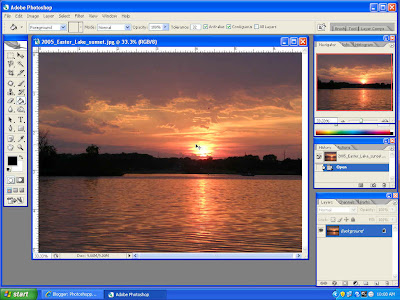
Step 1 : I have opened this image in Photoshop. Looks great. Let's make it better.

Step 2 : The first thing is to duplicate the image. In the Layers/Channels/Paths pallette drag the Background to the New Layer button (the icon like the folded bit of paper shown by the red arrow). It will form a new layer. Background copy layer has been formed. (See blue arrow)

Step 3 : Go to Image>Adjustments>Threshold
 Step 4 : The Threshold dialogue box opens and the image turns black.

Step 5 : Drag the little slider at the bottom till the value changes to 140 or thereabout depending on your image in the Threshold Level box. Click ok.

Step 6 : Go Filter>Blur>Radial Blur

Step 7 : This dialogue box opens.

Step 8 : Drag the Amount slider to the extreme right i.e. 100. Change the Blur Method to Zoom and set Quality at Good. Now click on the Blur Centre with the cursor. You will see that you are able to move it around. Set it approximately at where the sun is in the image. You need not be very accurate. Click ok. Depending on the configuration of your computer it will take a little while to process. That's normal.

Step 9 : This is how the image now looks.

Step 10 : Now change the blend mode to Screen from Normal in the Layers/Channels/Paths pallette. See above. Screen may not work with all images you can try other options such as Overlay or Lighten.

Step 11 : This is how the image now looks. Dramatic! Isn't it!. Some fine tuning is still required.

Step 12 : Drag the Background copy to the New Layer button. This form a Background copy 2 i.e. another duplicate layer.
 Step 13 : This is how the image looks. Now that's even more dramatic isn't it!

Step 14 : Now drag the Opacity slider in the Layers/Channels/Paths pallette to the left suitably. I have lowered the opacity to 17 %.

Step 15 : This is how the image looks. Easy isn't it?!

Step 16 : Now click on the Background copy layer to make it active or the one that you will work with.
 Step 17 Now select the Eraser Tool by clicking it.
Step 18 : Now click on the Eraser Tool on the top. When the above dialogue box opens set the Hardness to zero and the Master diameter suitably i.e. how large you want your brush to be.

Step 19 : Just gently brush away portions of the image where there is no light. There's not much to brush away in this image.

This is the finished image.
About Me
- satwik sharma
0 comments: